Your Guide to the VR Development Process
Jul 19, 2025

Peter Davis
HR Specialist
The VR development process is a structured, multi-phase journey that takes a virtual reality concept from an initial idea to a polished, deployable application. Think of it as a practical blueprint for any VR project, whether you're building an immersive game, a corporate training module, or a complex enterprise solution.
This process unfolds across seven core stages: ideation, prototyping, design, development, testing, optimization, and finally, launch. Each phase provides a clear deliverable for the next, creating a predictable workflow that keeps projects on budget and aligned with user needs.
Your Blueprint for VR Project Success
Jumping into VR development without a clear plan is a lot like trying to build a house without a blueprint. You might end up with something standing, but it will almost certainly be unstable, over budget, and not what you originally envisioned. Following a structured process is your best defense against common project killers like scope creep and ballooning costs.
Planning the Foundation
Before you touch a game engine or create a single 3D model, the initial planning phases set the entire project up for success. This is where you validate your core idea and draw firm lines around the project's scope to prevent feature bloat later on.
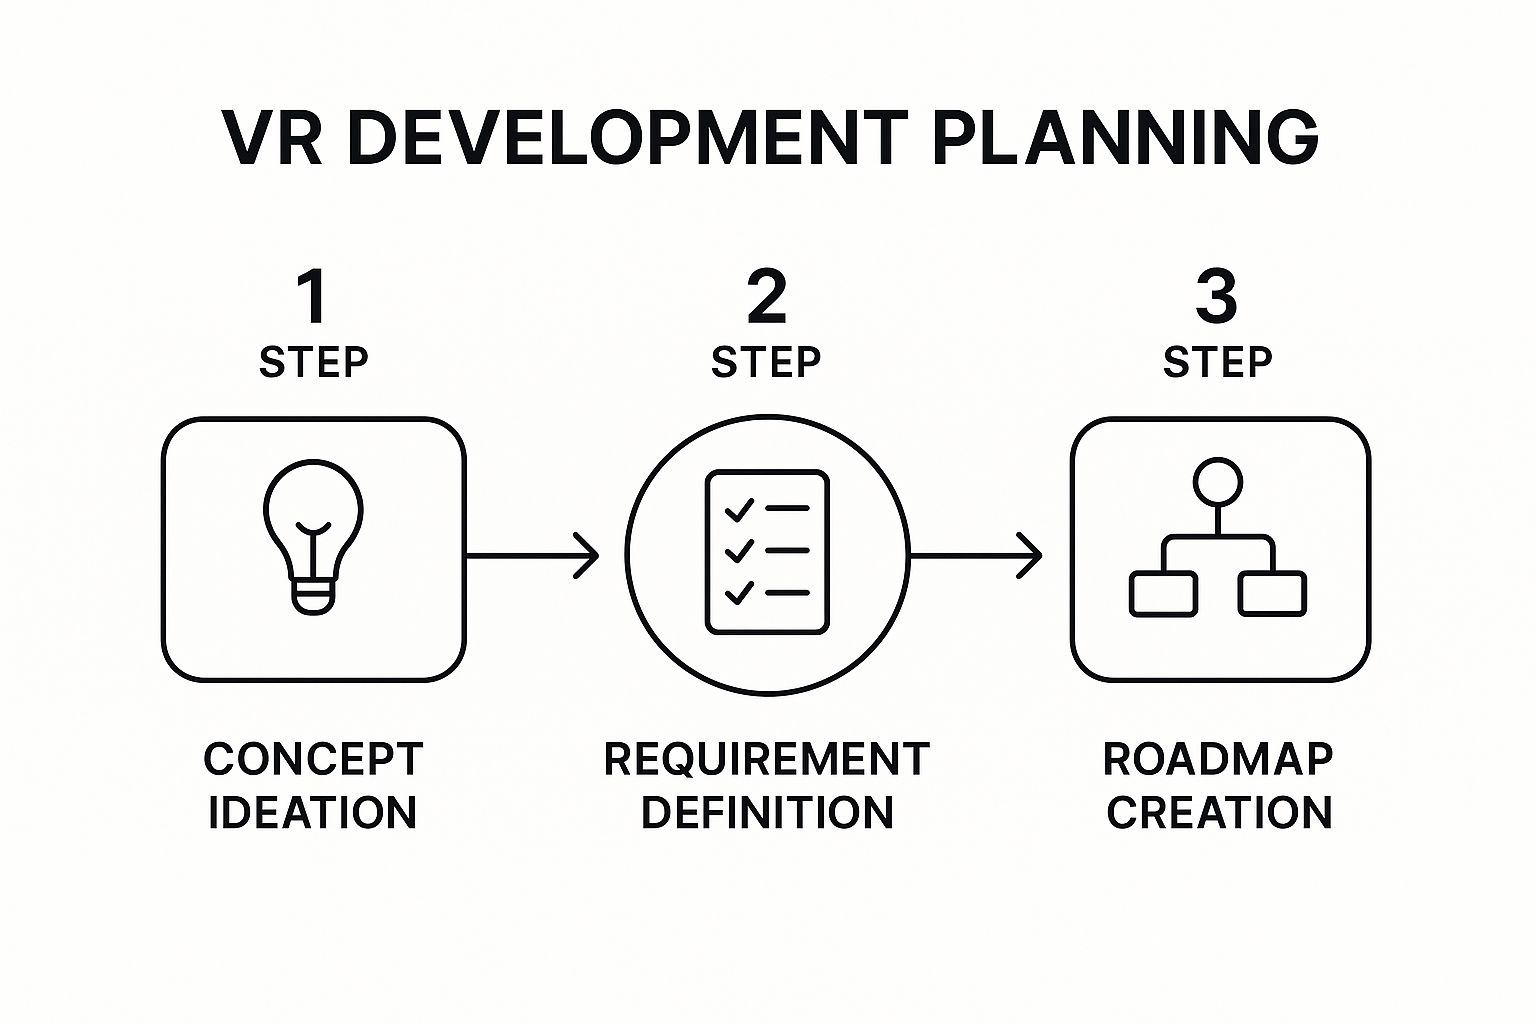
Following this sequence is the most effective way to ensure your technical requirements and creative goals are in sync from day one, preventing costly rework.
The market's explosive growth makes this disciplined approach more critical than ever. The global VR market was valued at $28.42 billion in 2023, and with the AR/VR gamer base expected to hit 216 million by 2025, the demand for high-quality content is through the roof. A well-defined process is essential if you want to compete. You can find more data on the growing VR market to see the full picture.
Key Takeaway: A structured development process isn't just about staying organized; it's a strategic tool for managing risk. It transforms a creative vision into a manageable, predictable, and ultimately successful project.
The journey from a simple idea to a fully realized VR experience is complex, but breaking it down into distinct phases makes it far more manageable. Each stage has its own clear objective and relies on specific tools to get the job done.
The 7 Phases of the VR Development Process
This table provides a high-level overview of the entire development lifecycle, from initial brainstorming to post-launch support.
Phase | Primary Goal | Common Tools & Platforms |
|---|---|---|
1. Ideation & Discovery | Define the core concept, target audience, and business goals. | Mind-mapping tools (Miro), project management software (Jira, Trello) |
2. Prototyping | Create low-fidelity, interactive mockups to test core mechanics. | Unity, Unreal Engine, paper sketches |
3. Design & Pre-Production | Develop detailed design documents, 3D assets, and UI/UX flows. | Blender, Maya, Figma, Adobe XD |
4. Development | Write code, build core features, and integrate all assets and systems. | Unity, Unreal Engine, C#, C++, platform-specific SDKs |
5. Testing & QA | Identify and fix bugs, performance issues, and usability problems. | In-house testing, beta testing platforms, bug tracking software |
6. Optimization | Refine performance to ensure smooth frame rates and a comfortable experience. | Engine-specific profilers, graphics optimization tools |
7. Launch & Post-Launch | Deploy to app stores, gather user feedback, and plan updates. | Oculus Store, SteamVR, app store analytics |
Understanding how each phase flows into the next is the key to navigating the development process efficiently and avoiding costly rework down the line.
From Raw Idea to Interactive Prototype

Every great VR experience starts with a practical idea, not a mountain of code. The journey from that initial spark to a working, testable model is the most crucial part of the entire VR development process. This is where you prove your concept has legs before you commit serious time and money.
It all begins with brainstorming ideas that are native to the medium. Constantly ask yourself: why does this absolutely need to be in VR? A good litmus test is whether your core mechanic relies on physical presence, hand tracking, or a 360-degree view. If it can be done just as well on a 2D screen, reconsider your approach. Once you have a promising direction, get specific about your target audience, the core gameplay loop, and what makes your project unique.
The Power of Gray Boxing
This brings us directly to the practical technique of 'gray boxing'—building a raw, untextured prototype. Fire up a game engine like Unity or Unreal Engine and construct your world and interactive elements using nothing but simple shapes like cubes, spheres, and planes. The goal isn’t to make it look pretty; it's to make it work.
This functional skeleton lets you answer fundamental questions almost immediately:
Scale and Space: Does the world feel the right size? Is moving around comfortable, or does it induce nausea?
Core Mechanics: Is the main action—like picking up an object or pulling a lever—satisfying and intuitive?
User Comfort: Are there any hidden elements causing motion sickness or visual strain?
Testing these with a gray box prototype provides instant, actionable feedback. Discovering a core mechanic feels clunky at this stage might take a single day to fix. Finding that same problem six months into production could derail your project. For anyone just starting out, mastering these early phases is a game-changer. Our guide on how to get into VR development can help you build these foundational skills.
This early validation is the secret to building successful VR. It’s where you separate ideas that sound good on paper from those that actually feel good in a headset. You’re not just building a level; you’re testing a feeling.
Validating Your Concept with Data
Prototyping is also where you confirm that your experience is actually effective, which is critical for non-gaming applications in training and education. It’s one thing to believe your idea is good; it’s another to prove it.
For example, academic research shows that VR training can improve learning outcomes by up to 76%, significantly boosting skill retention. Test your own core learning mechanics right there in the prototype, refine them based on direct user feedback, and gain confidence that you’re on the right track. This data-driven approach is what ensures your final product will deliver real, measurable results.
Designing Immersive Worlds and Interactions
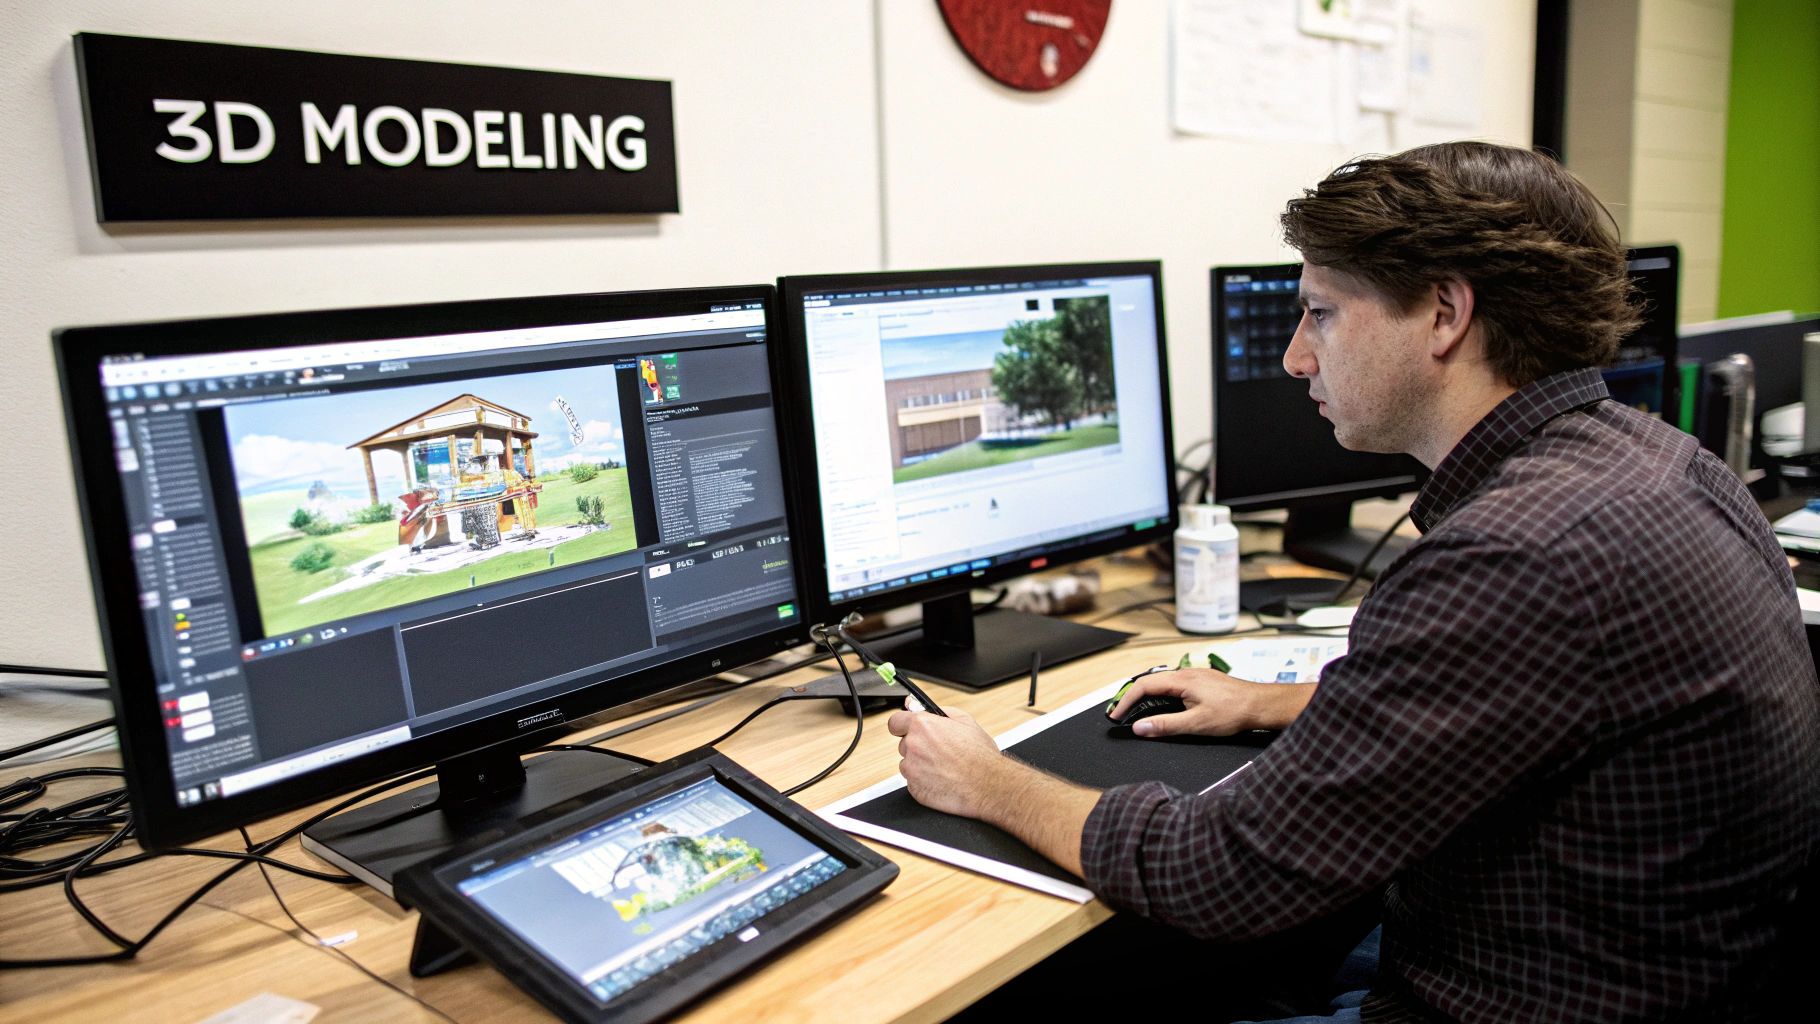
This screenshot from Unreal Engine gives you a glimpse into a richly detailed environment, showing how crucial things like assets, lighting, and textures are. In VR, these aren't just window dressing. They are functional tools you use to guide the player and make the virtual world feel solid and real.
Once you have a working prototype and have confirmed your core loop is fun, the VR development process shifts into the design phase. This is where you transform that gray-box world into a space that feels believable, intuitive, and—most importantly—comfortable for the user.
VR design is less about aesthetics and more about crafting a cohesive, functional reality. You need to build environments that feel expansive while subtly directing the user's attention. This is where you start using world-building as a practical tool.
Building Believable and Functional Worlds
A well-designed VR world doesn't need to shout at the player with intrusive arrows or text pop-ups. Instead, it uses environmental storytelling to lead them naturally. Think of it as an unspoken conversation between the space and the user, creating a flow that feels organic.
This is achieved through the careful placement of key elements:
Lighting: Use bright lights to draw the eye to key objects or paths. Use shadows to conceal areas you don't want the user to explore yet. A single spotlight on an interactive item is a clear, non-verbal "interact with me" signal.
Sound Design: Spatial audio is an incredibly powerful guide. The muffled sound of a distant machine or a voice calling from a specific direction gives users a clear destination and a compelling reason to explore.
Spatial Cues: Use architecture to create intuitive navigation. Doorways, well-defined paths, or even the arrangement of furniture can create a natural sense of direction, making movement feel natural instead of forced.
Great VR world design doesn't just show you a place; it makes you feel like you belong there. The environment itself becomes part of the user interface, guiding you without ever breaking your sense of presence.
Crafting Intuitive User Interfaces
Nothing shatters immersion faster than a traditional 2D menu plastered across your vision. That's why effective VR design relies on diegetic interfaces—UI elements that exist as physical objects within the game world itself.
Instead of a floating health bar, display health on a watch your character is wearing. Show the ammo count as a digital readout on the side of the weapon. The goal is to make every interaction feel physically satisfying and obvious, avoiding abstract menus that pull the user out of the experience.
This requires a deep focus on user comfort to sidestep motion sickness, which is a constant threat when what a user sees doesn't match what their body feels. For a closer look at the programs used to bring these worlds to life, check out our guide on the top VR development tools to master.
Ultimately, success in this stage of the VR development process comes down to making every interaction—from picking up an object to navigating a complex system—feel as natural as doing it in the real world.
With your prototype tested and your design document locked in, it’s time to move into full production. This is where you stop ideating and start building the functional heart of your VR application. You'll be rolling up your sleeves and turning those gray boxes and concepts into a living, breathing, interactive world.
This phase is all about disciplined execution inside your chosen game engine.
Your first job is to get your development environment properly configured. Whether you’ve picked Unity or Unreal Engine, this means integrating the right Software Development Kits (SDKs). For maximum reach across different headsets, the modern go-to is OpenXR. It provides a single, unified API for accessing VR features, saving you a ton of headaches. You might also use platform-specific toolkits, like the Meta Quest SDK, if you need deeper access to certain hardware features.
Programming Core Mechanics
Once your environment is ready, you can dive into programming the core mechanics you fleshed out during prototyping. This is the code that will drive every single interaction in your experience, from how a user picks up an object to how they navigate the virtual space. The specific language and tools here depend entirely on your engine.
In Unity, you'll write C# scripts to define the behavior of your GameObjects. This is where you bring everything to life, implementing the physics for throwing a ball, creating the logic for a complex puzzle, or defining how the user's virtual hands interact with buttons and levers.
In Unreal Engine, you've got a couple of options. You can use C++ for performance-heavy systems or turn to Blueprints, a powerful visual scripting system that lets you build out gameplay logic without writing traditional code. Most teams I've worked with use a smart mix of both.
No matter which engine you're in, the goal is always the same: write clean, efficient, and well-documented code. This isn't just about being tidy. This discipline is absolutely essential for debugging, optimizing, and collaborating with your team down the line.
The quality of your code has a direct impact on the user's feeling of presence. Laggy interactions or buggy physics will instantly shatter the illusion. Focus on building responsive and reliable systems from the very beginning.
Mastering the Asset Pipeline
A VR experience is so much more than just code. It's a carefully curated collection of 3D models, textures, animations, and sounds that create your world. Getting all of these pieces from their creation software into your game engine is a workflow known as the asset pipeline, and managing it well is critical.
A smooth pipeline is all about efficiency. Sit down with your team and establish clear standards for everything—file formats, naming conventions, texture resolutions—before production begins. Skipping this step leads to a disorganized, messy project that becomes a nightmare to manage and optimize. For any team, using a version control system like Git is completely non-negotiable. It tracks every single change, prevents people from overwriting each other's work, and lets you safely roll back to a previous version if something breaks.
This production phase is where you need a skilled team of programmers and technical artists, who happen to fill some of the most in-demand VR developer jobs in the industry today. Managing this stage properly is what ensures your project stays on track and that all its moving parts—code, art, and sound—come together seamlessly.
Optimizing Performance for a Seamless Experience

Let's get one thing straight: in virtual reality, performance isn't just a feature—it's everything. A dropped frame isn't a minor visual glitch; it's a direct cause of motion sickness that can instantly shatter immersion. This is why testing and optimization isn't just a final step; it’s a non-negotiable part of the entire VR development process.
The mission is clear: maintain a rock-solid, unwavering frame rate. For most headsets, that means hitting 72 to 90 frames per second (FPS) without fail. Anything less is unacceptable. This entire phase is about acting as a detective, hunting down every performance bottleneck before it can ruin the user's experience.
Identifying Performance Bottlenecks
You can't fix a problem you can't see. Your first move should be to use your engine's built-in diagnostic tools. The profilers in both Unity and Unreal Engine are indispensable. They provide a frame-by-frame breakdown of every process, showing you exactly where slowdowns are occurring. Is it the CPU or the GPU? The profiler will tell you.
If you’re "CPU-bound," it means the processor is struggling. This often points to overly complex game logic, intense physics calculations, or rendering too many individual objects at once. On the other hand, being "GPU-bound" is a graphics problem, usually caused by complex shaders, high-resolution textures, or too many dynamic lights.
The profiler doesn't lie. A single, poorly optimized shader or an inefficient script can be the sole reason your application is failing to hit its target FPS. Use these tools early and often to catch issues before they compound.
And remember, profiling your project inside the editor on a high-end PC is not enough. You must run tests on the actual target hardware. Performance on your development rig is irrelevant if your target is a standalone headset like the Meta Quest.
Practical Optimization Techniques
Once you've zeroed in on the source of the slowdown, it's time to take action. Optimization isn't about finding one silver bullet; it's a game of inches, making dozens of small, intelligent improvements that collectively add up to a perfectly smooth experience.
Some of the most effective techniques include:
Aggressive Polygon Reduction: Implement Level of Detail (LOD) systems. They automatically swap high-polygon models for simpler versions when objects are far from the camera. The user never notices, but the GPU gets a massive performance boost.
Texture Compression and Atlasing: High-res textures are memory hogs. Compress them using modern formats (like ASTC for mobile VR) and combine multiple smaller textures into a single "texture atlas" to reduce draw calls.
Shader Simplification: Complex shaders can bring even powerful GPUs to their knees. Scrutinize your most expensive shaders and create simpler versions, especially for small objects or those in the distance.
Below is a quick-reference table that outlines common performance traps and straightforward solutions to get things running smoothly.
Common VR Performance Bottlenecks and Solutions
This table breaks down frequent performance issues encountered in VR development and offers clear, actionable solutions to fix them.
Bottleneck | Primary Cause | Common Solution |
|---|---|---|
High Draw Calls | Rendering too many individual objects (meshes) per frame. Each one is a separate instruction to the GPU. | Use static batching for stationary objects and GPU instancing for identical, repeated meshes. Combine meshes where possible. |
GPU Overdraw | Multiple transparent or overlapping objects are rendered on top of each other in the same pixel, wasting GPU cycles. | Simplify transparent UI elements. Use the engine’s overdraw visualization mode to identify problem areas and redesign the scene. |
CPU Spikes | Complex game logic, heavy physics calculations, or inefficient scripts running every frame (e.g., in | Move heavy calculations out of |
High VRAM Usage | Uncompressed or oversized textures, complex models, and too many unique assets loaded into memory. | Implement texture compression (ASTC, DXT). Use texture atlases. Apply Level of Detail (LOD) systems to models. |
Shader Complexity | Using expensive, multi-pass shaders with complex lighting calculations, especially on mobile or standalone hardware. | Profile shaders to find the most expensive ones. Create simpler, mobile-friendly versions of complex shaders. Use baked lighting instead of real-time lights where possible. |
Treating these bottlenecks early and aggressively is what separates a good VR experience from a great one.
Mastering these skills is a major differentiator for any successful developer. It directly impacts the final product's quality and can even open up new career paths. In fact, a deep understanding of performance optimization can significantly influence a VR developer salary, as studios place a huge premium on engineers who can deliver flawless experiences on constrained hardware.
Launching and Supporting Your VR Application
You've made it. Getting your application onto digital storefronts is the final, exciting hurdle. This is where all your hard work finally meets its audience, but successfully navigating app store submissions and handling what comes next requires a clear, organized strategy.
The job isn't done when you compile that final build. Before you hit "submit," you need a rock-solid release plan. This means preparing all the materials that will represent your project to the world—and to platform reviewers.
Preparing for a Smooth Release
Think of your store listing as the front door to your entire VR experience. It has to be polished, professional, and genuinely compelling. A rushed submission is a recipe for rejection, which can delay your launch for weeks.
Here’s your pre-launch checklist:
Finalized Build: The fully tested, optimized, and bug-free version of your application. No compromises.
Marketing Assets: High-resolution screenshots, a captivating trailer video, and a striking key art image are non-negotiable.
Store Descriptions: Write a clear, persuasive description of your app. Highlight its key features and explain what makes it special.
One of the most common mistakes is treating marketing materials as an afterthought. Platform reviewers and potential customers will judge your application based on your store page long before they ever put on a headset. Dedicate real time to making these assets shine.
Navigating Platform Submissions
Every digital storefront plays by its own rules. Submitting to the big players like the Meta Quest Store and SteamVR means you have to meticulously follow their technical requirements and content policies.
The Meta Quest Store, for instance, is highly curated and has incredibly stringent performance and comfort standards. They will rigorously test your app to make sure it maintains a stable frame rate and passes all their Virtual Reality Checks (VRCs). SteamVR is more open, but you still need to follow their guidelines to ensure your app is discoverable and works correctly for users with different hardware.
The Importance of Post-Launch Support
Launch isn't the finish line; it's the starting gun. The real work of building a community and ensuring your project has a long life begins now. Many developers overlook post-launch support, and it's a critical part of the process.
Your priorities should immediately shift to gathering user feedback from reviews and community channels like Discord. This feedback is gold. Use it to plan future updates, fix bugs you inevitably missed, and add the features your audience actually wants.
Engaging with your community and consistently shipping patches shows you're committed to the project. It builds trust and encourages positive word-of-mouth. This ongoing support is especially crucial for specialized applications like those found in advanced virtual reality training programs, where user feedback directly improves learning outcomes and the effectiveness of the tool.
Of course, here is the rewritten section, following the style and tone of the provided examples.
Got Questions About VR Development? We've Got Answers.
Even with the best-laid plans, building a VR experience is a journey full of questions. Getting clear on some of the common ones early on can save you a world of headaches later. Let's tackle a few of the most frequent queries that come up during the VR development process.
One of the first things everyone wants to know is how long it's all going to take. There's no single answer, but a simple VR prototype can often be knocked out in 2-4 weeks. A polished, commercial-ready game or a complex training application? That's a much bigger lift, easily taking 12-18 months or even more. It all boils down to your project's scope, the size of your team, and how complex your features are.
Choosing the Right Engine
Another big question that always comes up is the great debate: Unity or Unreal Engine? The truth is, there's no magic bullet. The "best" engine is the one that fits your team's skills and your project's goals.
Unity: This is often the go-to for its C# programming language, massive asset store, and fantastic support for mobile and standalone VR headsets like the Meta Quest. It’s generally seen as more approachable for smaller teams or those just getting their feet wet in VR.
Unreal Engine: If you're aiming for jaw-dropping visual fidelity, Unreal is a powerhouse. It’s famous for its cutting-edge graphics and its powerful Blueprints visual scripting system, making it a stellar choice for high-end experiences, especially on PC VR.
My advice? Stick with the engine your team already knows. The learning curve for either one is steep, and leveraging the expertise you already have in-house will speed up development far more than any single engine feature.
Keeping Scope and Budget in Check
Finally, developers are always asking how to keep a project from spiraling out of control, both in scope and budget. The key here is a one-two punch of rigorous planning and ruthless prioritization.
You have to define your Minimum Viable Product (MVP) right at the start and then guard it fiercely. Every single feature that gets proposed after that initial plan needs to be scrutinized. Ask yourself: does this really improve the user experience, or is it just a nice-to-have? Regular playtesting is your secret weapon here. It keeps you honest and ensures you’re only spending time and money on what truly matters.
Ready to build the future of immersive technology? Arvello Jobs is the premier job board for professionals in AR, VR, and XR. Find your next role with industry leaders and innovative startups by exploring our curated openings today.